

How to Fix your Door Latch that Won’t Retract
There’s nothing more annoying than a stuck door latch that won’t retract properly. This can be a real issue during the winter months if you’re trying to keep the warmth in your home. Read on to find out how to diagnose the route of the problem, and the easy ways to fix it! These can all be carried out by yourself. If your door latch won’t retract, read on!
8 Reasons why your Door Latch won’t Retract
Start by carrying out some troubleshooting to try and identify the problem. There’s lots of ways to fix a door latch that won’t retract.
1. Door Latch Sticking
Start with the metal latch itself. Make sure that it moves in and out naturally. Internal door latch mechanisms are never the highest quality, and the internal mechanism can easily start sticking with age and the lack of lubrication, resulting in a jammed door latch. If the problem is the door latch sticking, a quick squirt of WD 40, or 3 in 1 oil, and a few cycles of the latch in and out should get it working again. This is the best way to solve a jammed door latch.
2. Door Hole
It’s also important to check the hole in the middle of the strike plate that the metal latch clicks into. This should be open and free from the wood from the frame or any other foreign body stopping the latch moving into it when it’s closed. If your door latch isn’t retracting properly, this could be the reason.
3. Position of Door
Check the gap between the door and the metal plate attached to frame. There is a possibility that that this gap is so large that the latch can’t catch on to the strike plate hole because of door has been badly fitted fir the metal plate. This means the stuck door latch will slide past the strike plate. Rather than changing the door, there is actually a way of adjusting the position of the door, and moving it over so that latch is closer to the strike plate.
To fix a door with this, you need to adjust the door’s hinges. This is actually possible by using a set of paying cards (some people also call this the credit card trick). Playing cards are sometimes used by woodworkers to shim items, and that’s exactly what you need to do here. It doesn’t matter what type of cards use.
With one side of the hinge open, offer up the card, and mark the size of the hinge plate on the card. This allows you to cut the card to the exact size of the plate, and then it can be used as a template to make some more. With these cut to size, they can be added behind the hinge plate, between the hinge and the frame.
If needed, you can also add these between the hinge on the door without anyone seeing them. Give an adjustment up to a maximum of around 6 millimeters or quarter of an inch, depending on the size and thickness of your hinges. The same screws can be used again, and just punch through the cards when screwed in. The more shims or cards you use, the closer the door will move towards the door frame on the lock side. This is also a good way of leveling the door if you just use them on the bottom hinge, to help pick the door up if it started to fall slightly.
4. Misaligned Strike Plate to Door Frame
So if it’s none of the 3 issues we’ve already looked at, then it’s probably going to be the position of the strike plate relative to lock position of the latch. There are some problems could arise. The misaligned strike plate could be too high, too low, or too far back. What you find with older doors, is as they get older, and they start to fall a little bit, then the probability is the latch is coming too low. This is one of the main reasons for doors to have a misaligned strike plate.
This means the latch is unable to get into the hole. You will have to fix this to ensure the latch and strike plate hole are properly aligned. To have a look at the latch and see where it’s going to hit the strike plate, put a piece of masking tape on the plate to highlight your pencil marks.
When you close the door, use a pencil to mark the top and bottom positions of the latch. Then open the door, and compare your pencil marks with the receiving hole on the plate. If your strike plate is too high and your latch is only just missing the hole, one solution is to grind down the bottom of the plate slightly. You can do this by using a file or Dremel, which will essentially make the hole bigger. This only works if the latch is really close to fitting.
5. Move Forward Strike Plate
It is likely your strike plate only needs to be moved forward a millimeter, or a sixteenth of an inch to get a nice secure fit. This process will also help you if the plate needs to be moved down slightly because it’s not fitting or installed properly. Unscrew the plate to remove it from the wall, and position it where you think it needs to be and mark the edge, which gives you a line for your chisel to cut to.
If your frames are standard soft wood, you can use a chisel instead of a hammer. Gradually cut deeper along your mark, until you’re at the same depth as the rest of the rebate on the plate. Because you’ve moved the whole plate forward, you must also enlarge the front section of the hole to allow the new latch part to enter.
Take your time, and keep running around the perimeter of the cut, and gradually get deeper. Before fixing the plate permanently, use masking tape to temporarily hold it in position, to try to see if you’ve moved it forward enough. If you can see the latch bolt is moving fully into the receiving hole with the play in this position, now you can secure it permanently.
As you move the plate forward, you’ll notice the existing screw holes and now off center, and if you try to reuse these, they’ll pull the metal plate down back to the original position as you tighten them up. To prevent this from happening, fill the existing holes with matchsticks, and re-drill new holes in the correct position. Match sticks are better than tooth picks, which is another common way of filling holes, as match sticks are the closer to the type of wood you have in the frame.
Match sticks are also easy to whittle down to shape if you need to. Your existing holes to fill may be too big for one match stick, and too small for two. If this is the case, shave some wood away from them both to to make it a perfect fit. Force the match sticks into the screw holes as far as you can. Then trim with the Stanley knife. If you get the fit right, there’s no need for glue as they won’t be going anywhere.
You can now place the plate in its new position, and use a nail to make a shallow pilot hole, which should help stop the drill from wondering. Start with the smallest drill you have, and then enlarge the whole with the correct size for the screws.
Once you screw the whole lock body in place into the new position, you should hear a nice positive click of the latch. Ideally, your strike plate will not have any gaps around it. But if you do have any gaps, all you need to do is fill them in with a little bit of flexible type sealer. Make sure you use sealer that can be painted over. Test the handle to make sure the door lock completely fits. This is the best permanent solution to ensure that your door latch will now retract smoothly.
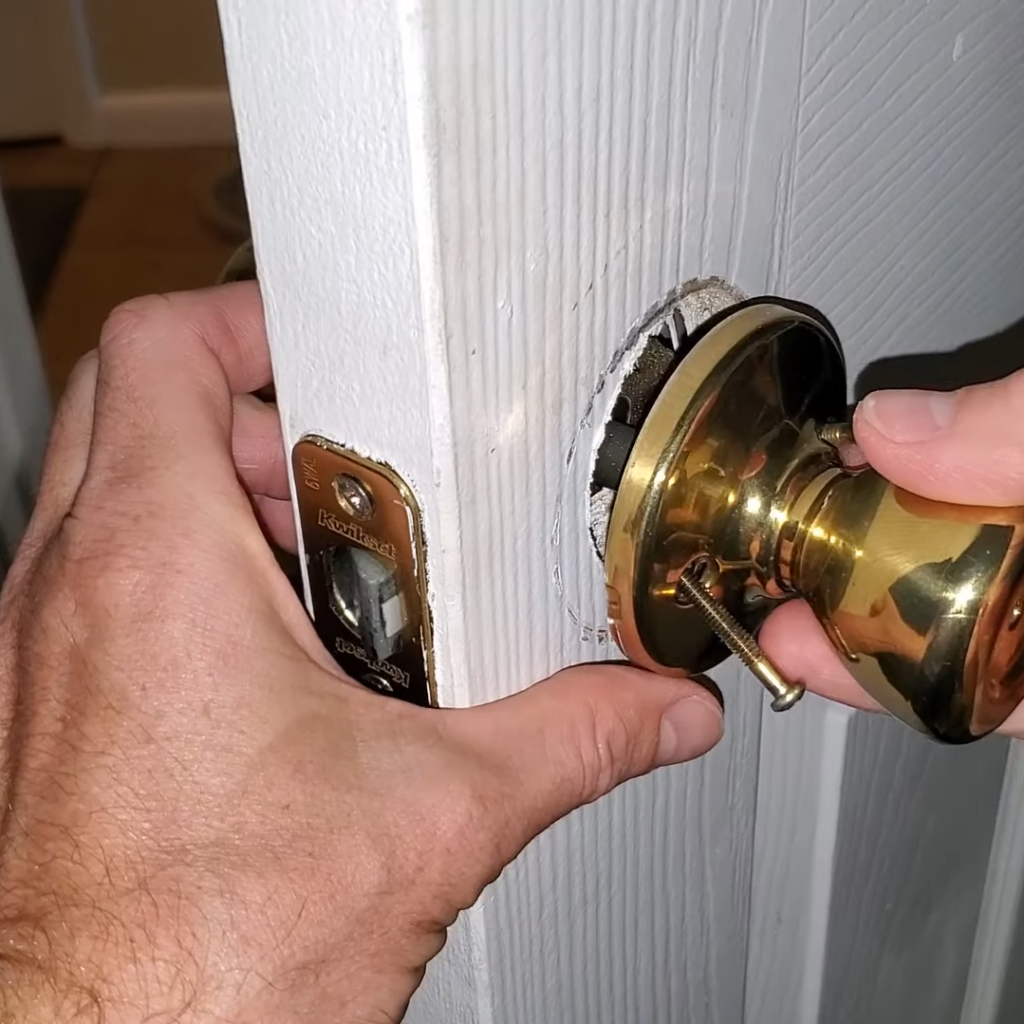
6. Pull off Door Knob
Start unscrewing the screws holding your door knob to the door, and then pull the door knob slightly off the door, to take a closer look. Sometimes it’s just the latch getting stuck up behind the plate, and all you need to do is loosen and turn and fiddle with the door and latch a little bit. This should fix your problem if it’s just a minor issue.
7. Replace Mechanism
If your problem is more severe, you’ll need to unscrew your door knob and pull it full off your door. Make sure to pull the other side out too. The pull out the broken mechanism with the door latch.
There is a chance a spring has broken in your front latch mechanism, which means the latch cannot function properly. You’ll need to replace this. If the door having problems is really important in your home and needs to be able to close, such as your front door. A short term fix is stealing working parts from another door in your house. This could be from a closet door for example. Follow the same process by removing the door knobs, but you only need to take the mechanism from inside the door.
Complete the process again on your important door, but in reverse to attach all of the working pieces together again. Test the door shut to make sure you’ve solved the problem. However, remember this is not a permanent fix, and you will need to now replace the less important door latch by ordering some replacement parts such as a full latch assembly and new mechanism. This temporary fix will help solve the problem of the door latch that won’t retract.
8. Clean your Door Lock
There’s a possibility your stuck door latch won’t retract because of dirt and grime and accumulated in your door latch over time. If you think this could be the problem with your front door latches, you’ll need to take apart the door lock. Dirt in your lock can result in a sticky latch.
When you take apart the door, thoroughly clean all sections of each part of the door. You could use wipes to do this.
If the dirt is has to get off, place the parts of the door into plain vinegar until you see the grime disappearing. Then reattach the elements to the door. Cleaning all the dirt out of your spring bolt, door latch, and strike hole plate, will prevent future rust.
Final Thoughts on Door Latch Won’t Retract
Hopefully you now have a fully functioning door latch that retracts. If you’re still unable to identify the problem, make sure to speak to a professional locksmith who can fully examine your door handle, and get you some new high quality locks.
Make sure you get the issue solved correctly, as a short term fix is just going to result in you needing to waste more time fixing your stuck door latch issue again. If this is becoming a regular problem for you, it may be a good idea to order some higher quality lock products so there’s less maintenance. For now though, you should be able to have a closed door with the ability of shutting completely.